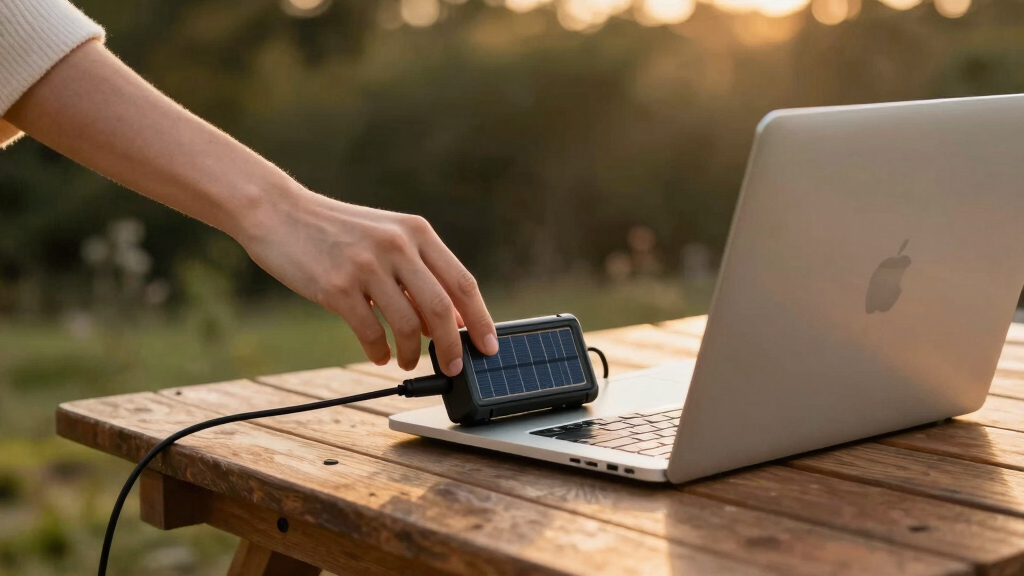
This guide explains how to assemble a solar-powered laptop charger. It is designed for users comfortable with basic electronics and DIY projects. By following these steps, you will be able to generate solar power to charge your laptop in outdoor or off-grid situations, providing a sustainable and portable power solution.

SOARAISE Solar Charger Power Bank – 48000mAh Wireless Portable Charger with 4 Solar Panels, Built-in Cables, Fast Charging, and F…
- ✔ Battery Capacity: 48000mAh
- ✔ Solar Panels: 4
- ✔ Ports: 3 (2 USB-A, 1 USB-C)
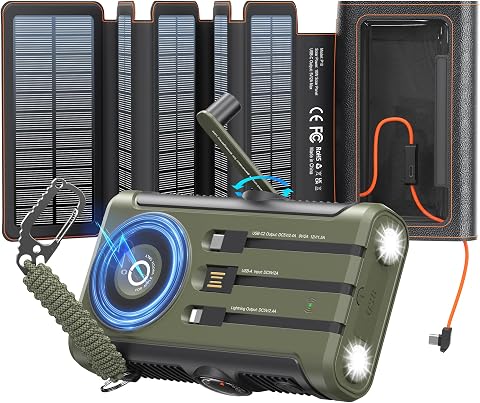
Solar Charger Power Bank 20000mAh with Foldable Solar Panels, Wireless Charging, and Hand Crank Emergency Support
- ✔ Capacity: 20000mAh
- ✔ Solar Panels: 10W foldable monocrystalline silicon
- ✔ Output Ports: 1 USB-C (20W PD), 2 USB-A

Portable Power Station 300W, 220Wh/60000mAh Outdoor Solar Generator Backup Battery Pack
- ✔ Power Output: 300W (600W Peak)
- ✔ Battery Capacity: 220Wh / 60000mAh
- ✔ Weight: 5 lbs
Difficulty: Intermediate | Time: 4-6 hours
What You’ll Need
Tools & Materials:
- Soldering iron and solder
- Wire cutters and strippers
- Multimeter
- Drill (if mounting components)
- Screwdriver
Knowledge:
- Basic understanding of electrical circuits
- Ability to solder and work with wiring
- Knowledge of voltage and current ratings
Ensure the solar panel’s voltage and power output are sufficient for your laptop’s charging requirements. Use high-quality components for safety and efficiency.

SOARAISE Solar Charger Power Bank - 48000mAh Wireless Portable Charger Built-in 4 Cables and 4 Solar Panels, PD QC 3.0 Fast Charging USB C Battery Pack with Flashlight for Camping Travel
- High-Efficiency Solar Panels: 4 premium panels for faster solar charging
- Large Capacity Power Bank: 48000mAh lithium-polymer battery for extended use
- Multi-Device Compatibility: 4 built-in cables and 3 ports for versatile charging
As an affiliate, we earn on qualifying purchases.
SOARAISE Solar Charger Power Bank – 48000mAh Wireless Portable Charger with 4 Solar Panels, Built-in Cables, Fast Charging, and F…
The SOARAISE Solar Charger Power Bank stands out for its enormous 48000mAh capacity, making it ideal for extended outdoor trips where power access is limited. Its four solar panels enable faster solar recharging, and the built-in cables plus wireless charging support multiple devices simultaneously. Compared with smaller options, it offers superior capacity but at the cost of increased weight and complexity, which could be cumbersome for casual users. Its rugged, waterproof design makes it a top choice for camping and travel, but the reliance on sunlight means recharge speeds vary with weather conditions.
Pros:
- High-capacity 48000mAh battery for extended outdoor use
- Efficient 4 solar panels for faster solar charging
- Supports multiple devices simultaneously with built-in cables and wireless charging
- Durable, waterproof, and shockproof for outdoor durability
Cons:
- Heavy weight may be cumbersome for some users
- Charging speed depends heavily on sunlight availability
- Features may be overly complex for casual or infrequent users
Best for: Outdoor enthusiasts and campers needing long-lasting power on extended trips
Not ideal for: Casual users or those prioritizing ultra-lightweight, compact solutions
Bottom line: This power bank is perfect for serious outdoor users needing maximum capacity and durability, despite its weight and complexity.
“This power bank is perfect for serious outdoor users needing maximum capacity and durability, despite its weight and complexity.”
Solar Charger Power Bank 20000mAh with Foldable Solar Panels, Wireless Charging, and Hand Crank Emergency Support
The Solar Charger Power Bank 20000mAh balances portability with emergency features, making it an excellent choice for travelers and outdoor adventurers. Its foldable solar panels support recharging in remote locations, and wireless charging adds convenience for devices like iPhones or earbuds. The inclusion of a hand crank provides a backup power source during emergencies—an invaluable feature when sunlight is unavailable. Compared to larger power stations, this model is more portable but offers less total power, so it suits moderate device needs. Its build quality and fast-charging capabilities make it a reliable all-rounder for outdoor scenarios.
Pros:
- Foldable solar panels for remote recharging
- Wireless charging for multiple device types
- Hand crank for emergency power and lighting
- Supports fast charging with PD 3.0 and QC 3.0
Cons:
- No specific weight or size info makes portability assessment difficult
- Performance depends on sunlight conditions
- Bulkier than simple power banks, may be less pocket-friendly
Best for: Travelers and outdoor users who need emergency support and device versatility
Not ideal for: Users requiring high wattage or supporting high-power appliances
Bottom line: This model excels for outdoor travelers needing emergency features and wireless charging in a portable form factor.
“This model excels for outdoor travelers needing emergency features and wireless charging in a portable form factor.”
Portable Power Station 300W, 220Wh/60000mAh Outdoor Solar Generator Backup Battery Pack
The Portable Power Station 300W offers substantial wattage support in a compact, lightweight design. Capable of charging up to seven devices simultaneously, it’s ideal for camping, emergencies, or even backup home use. Its multiple outlets—including AC, USB, and DC—make it versatile for various devices, and its ability to recharge via solar, car, or wall outlet adds flexibility. While the 220Wh capacity is less than some power banks, it delivers enough power for laptops and small appliances, making it a strong contender for those who need more than just basic device charging but still value portability. The tradeoff is the slightly larger size and the need to balance power needs against weight.
Pros:
- Compact and lightweight at 5 lbs
- Multiple charging options including solar
- Supports sensitive devices with pure sine wave inverter
- Built-in LED for outdoor or emergency lighting
Cons:
- Supports devices with less than 300Wh capacity
- Not suitable for high-wattage appliances
- Red indicator light may be briefly active during startup
Best for: Campers, emergency preparedness, and users needing reliable power for multiple devices
Not ideal for: Users requiring high-capacity home backup or supporting high-wattage appliances
Bottom line: This portable power station is perfect for outdoor enthusiasts and emergency users needing reliable, multi-device support with moderate power capacity.
“This portable power station is perfect for outdoor enthusiasts and emergency users needing reliable, multi-device support with moderate power capacity.”
As an Amazon Associate we earn from qualifying purchases.
Before You Start
Verify your laptop’s power input specifications (voltage and current). Gather all components and tools before beginning. Work in a well-ventilated area and follow safety precautions when soldering and handling electrical parts.
Step-by-Step Instructions
Step 1: Connect the solar panel to the charge controller
Attach the positive and negative leads from the solar panel to the corresponding input terminals on the charge controller, ensuring correct polarity.
Tip: Use MC4 connectors for a secure connection and easy disconnection for testing or replacement.
Check: Use a multimeter to verify voltage output at the charge controller terminals matches the solar panel’s rated voltage.
Step 2: Wire the charge controller to the battery pack
Connect the output terminals of the charge controller to the lithium-ion battery pack, observing correct polarity and using appropriate wiring and connectors.
Tip: Insert a fuse or circuit breaker between the charge controller and battery for safety.
Check: Use a multimeter to confirm the battery receives voltage without short circuits or overload.
Step 3: Set the buck converter output voltage
Connect the buck converter to the battery pack, then adjust its output to match your laptop’s required charging voltage, typically 19V or 20V.
Tip: Use the multimeter to measure voltage at the converter’s output while adjusting the knob carefully.
Check: Verify the voltage is stable and within the acceptable range for your laptop before connecting the charging cable.
Step 4: Connect the buck converter to the laptop charging port
Attach the appropriate connector (barrel jack or custom cable) from the buck converter output to your laptop’s charging port, ensuring correct polarity.
Tip: Test with a multimeter before connecting to the laptop to confirm voltage and polarity are correct.
Check: Connect to the laptop and observe if it begins charging; check for stable power without interruptions.
Step 5: Test the entire system outdoors in sunlight
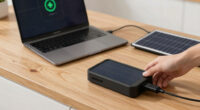
Place the solar panel in direct sunlight, connect all components, and verify that the laptop begins charging and the system remains stable.
Tip: Avoid shadows on the solar panel during testing to maximize output.
Check: Laptop shows charging indicator, and multimeter confirms stable voltage and current flow.
Common Mistakes to Avoid
- Connecting the solar panel with incorrect polarity. — Always double-check the positive and negative terminals before connecting; use color-coded wires if possible.
- Overloading the battery or components. — Ensure the solar panel’s wattage matches your battery capacity and that all components are rated for the expected voltage and current.
- Leaving connections unsecured or exposed to weather. — Use waterproof enclosures and secure connections to prevent corrosion and damage.
Troubleshooting
Problem: Laptop is not charging despite system being connected.
Solution: Check all connections for correct polarity, measure voltage at the laptop port, and verify the system components are functioning properly.
Problem: Voltage fluctuates or drops below required level.
Solution: Ensure the solar panel is in direct sunlight, and confirm the buck converter is properly adjusted and stable.
Problem: Battery is not holding charge or system shuts down.
Solution: Test the battery with a multimeter, replace if faulty, and verify the charge controller is functioning correctly.
What Success Looks Like
The system supplies consistent voltage to your laptop, evidenced by the charging indicator. The solar panel produces enough power in sunlight, and the battery maintains charge without overheating or failure.
Next Steps
Monitor system performance regularly, especially in varying sunlight conditions. Protect components from weather when not in use. Consider adding a display to monitor voltage and current, and upgrade components as needed for higher power demands.
Frequently Asked Questions
Can I use any solar panel for this project?
No, the solar panel must meet or exceed your laptop’s voltage and wattage requirements. A panel with at least 20V and 10W is recommended for most laptops.
How long does it take to charge a laptop with this system?
The charging time depends on solar intensity, panel wattage, and your laptop’s battery capacity. Expect 2-4 hours of direct sunlight for a full charge under ideal conditions.
Is this system portable or fixed?
This setup is portable if components are lightweight and can be assembled into a compact case. For permanent installation, secure components on a stable surface or enclosure.
Can I expand this system for multiple devices?
Yes, by adding additional solar panels and a larger battery bank, you can power multiple devices simultaneously, ensuring proper voltage and current ratings.